
Octolooks
It has never been easier to match the content you want to grab to the relevant fields. Meet the visual selector feature of Scrapes and XPath syntax for advanced usage.
Table of contents
What is visual selector
Web scraping in its simplest definition; is the process of extracting, processing and automatically saving the received response by sending requests to the source site through various software code blocks. If this process is considered in WordPress; the corresponding content must be extracted and matched with the related fields to form a WordPress post. This process, which is very difficult and complex under normal conditions, even for a developer from the beginning to the end; considering other technical details, it requires advanced skills and knowledge. These codes, which are mostly developed to run for a specific source site, are not flexible and do not address you as an end user. This is exactly where Octolooks Scrapes and its visual selector come in.
Visual selector; is one of the main features of Octolooks Scrapes, which allows you to easily match content from the source site to the corresponding WordPress fields without any coding knowledge as a WordPress Scraper Plugin. This feature; allows you to visually select the XPath values of the source site instead of manually defining from the source site in fields such as title, content, featured image in order to perform a scraper task. Visual selector developed flexibly to work on different source sites; is an innovative feature that is produced by us first and directs the sector.
Using the visual selector
The visual selector is developed to address the end user therefore is very easy to use. Once you have selected the task type that suits your needs, the steps you need to take are as follows.
- Enter the web address of the source site from which you want to load content to the visual selector in the Source URL field. This web address is the address itself for the single scrape task type, for the serial scrape task type is the web address of the source page’s listing page.
- Click the button with the “crosshair” icon next to the corresponding field where you want to define the XPath value with the visual selector. The source site, will be loaded into the visual selector and opened in full screen, depending on the selected task type and the defined field.
- Hover your mouse over the content of the source site loaded in the visual selector and want to be matched with the relevant field and click when it is surrounded by a red frame. The XPath value of the clicked element will be defined in the relevant field and the visual selector will automatically close.
Visual selector and special cases
Although the visual selector is very easy to use, there are some tips to consider in some fields. These special cases are as follows.
Post item selection
In the case of serial scrape task type is selected, instead of selecting all of the excerpt content on the listing page in the source site, while defining the “post item”; the simplest detail page redirecting link should be selected such as the title, the content image, or “show more” type of text. After this definition, other links of the same structure on the listing page will be detected automatically.
Next page selection
In the case of serial scrape task type is selected, instead of selecting all of the next page button container on the listing page in the source site while defining “next page”; the simplest link that shows the continuation of the summary contents with the right arrow icon or “next”, “next page” text, should be selected. After this definition, other links of the same structure on the following listing pages will be automatically detected.
Content selection
In the case of “Select from source” option is selected for “Content” field instead of selecting the entire page including the header, sidebar, footer, etc. the smallest area covering the content should be selected. Unwanted content within the selected area can then be deleted or edited with the “Find and replace” feature.
Categories selection
Instead of selecting a single element when selecting category or taxonomies of other custom post types, including separators; the smallest area covering these elements should be selected. If no separator exists, the manual Xpath value must be defined to match all.
Automatically detected content
In case the source site contains some specific HTML elements which are determined as web standards, XPath values of these elements are automatically defined in the relevant fields with the word “automatically found”. You can leave these fields intact or redefine them manually with the visual selector too.
Content not visible in the visual selector
You can activate the “Disable styles” option at the top left of the visual selector when the content you want to extract is available in the page source but is not visible in the interface. Content hidden in the source site with CSS and then displayed in JavaScript will be visible in the visual selector.
Contents varying from platform to platform
In case the source site from which the content is intended to extract displays content varies depending on the platform, you can change the “user-agent” value of your web browser to a specific platform different from your current device, operating system, or web browser. After this operation you need to do before a new task creation, the requests to the source site will be made using the new agent user-agent “value” such content will be visible and selectable with the visual selector afterwards.
Defining manual xpath value
Although the visual selector has been developed to work flexibly on most source sites; in some cases you may need to manually define the XPath value for a more advanced use. The information that you can use to manually match the content you want to capture without using the visual selector is as follows.
What is XPath
In its basic definition XPath (XML Path Language); is a query language that allows you to find the elements and their properties contained in XML type documents. Since the HTML pages that make up the websites have a similar structure to the XML-type documents, the XPath syntax can be used to select the elements found on those pages. XPath selectors are very similar to CSS selectors; they don’t need an additional PHP library and are preferred in our plugin infrastructure because they perform better.
Necessary tools
The helper tools you can use to find the XPath values that need to be manually defined in the relevant fields are as follows. Shared examples and tools are Google Chrome compliance, but you can browse alternative tools that perform the same function if you’re using another browser.
- XPath Finder: It is a free Google Chrome extension that lets you see live HTML elements matching the XPath value entered on the source site. After installation, you can see the fields that correspond to the XPath value on the source site by entering the relevant XPath value in the field on the “XPath Finder” tab while the source site and “Developer Tools” (F12) is opened in your browser.
- Quick Javascript Switcher: It’s a free Google Chrome extension to work on the web browser that lets you emulate how the source site is interpreted on the server side by disabling JavaScript code developed. After installation, you can disable JavaScript code by clicking the “Quick Javascript Switcher” button in the plugins section while the source site is open in your browser.
- XPath Tester: It is a free website that allows you to see filtered HTML elements that match the entered XPath value in a separate field. You can see all the matching elements by entering the source codes in the “XML Input” “field and the corresponding XPath value in the” XPath Expression” field and clicking the “Test Xpath” button.
Basic XPath selectors
Let’s examine the basic XPath selectors starting with “//” on the sample XML data below that includes a restaurant’s breakfast menu, the foods in this menu, and the name, price, description and calorie information for these foods and test it with the XPath Tester tool.
XML Input
		<breakfast_menu>


			<food>


				<name>Belgian Waffles</name>

				<price>$5.95</price>

				<description>Two of our famous waffles with plenty of real maple syrup</description>

				<calories>650</calories>


			</food>

			<food>


				<name>Strawberry Belgian Waffles</name>

				<price>$7.95</price>

				<description>Light waffles covered with strawberries and whipped cream</description>

				<calories>900</calories>


			</food>


		</breakfast_menu>
Node selector
You can establish a parent and child relationship by placing a “/” between the nodes and select the sub-nodes. In the sample XML data, all elements that match the definition of “price under food” is as follows.
Expression
//food/price
Result
		<price>$5.95</price>

		<price>$7.95</price>
Index selector
You can choose the node in the order you want by defining a numerical value between “[]” next to the nodes and select. In the sample XML data “element matching the price under 1. food is as follows.
Expression
//food[1]/price
Result
<price>$5.95</price>
Comparison selector
You can choose nodes by defining comparison rules between “[]” signs next to the nodes with operators such as greater, smaller, equal. In the sample XML data, the element that conforms to the definition of “food with calories node value greater than 700” is as follows.
Expression
//food[calories>700]
Result
		<food>


			<name>Strawberry Belgian Waffles</name>

			<price>$7.95</price>

			<description>Light waffles covered with strawberries and whipped cream</description>

			<calories>900</calories>


		</food>
Attribute selector
You can select an element in [@name=”value”] format according to the attribute and attribute value, such as “id”, “class” or “data”. Examples of attribute selectors are as follows.
-
Select all elements whose value of the “class” attribute is “black”.
//[@class="black"] -
Select all “a” elements with the value of “class” attribute is “black”.
//a[@class="black"] -
Select the “div” element whose value of “id” attribute is “products”.
//div[@id="products"] -
Select all “a” elements whose “class” attribute value is “black” under the “div” element whose “id” attribute value is “products”.
//div[@id="products"]/a[@class="black"]
Containing attribute selector
In some cases, elements have attributes consisting of multiple and variable values. (E.g. class=”post post-123″). Since such an element does not have a single and constant attribute value, instead of directly selecting it according to the attribute value; You can select [contains (@name, “value”)] format according to any of the values it contains. Examples of containing attribute selectors are as follows.
-
Select all elements with one of the values of the “class” attribute is “black”.
//[contains(@class, "black")] -
Select all “a” elements with one of the values of the “class” attribute is “black”.
//a[contains(@class, "black")]
Position selector
You can select an element in the [position ()> 1] format according to its position in other similar elements with the same properties. Examples of position selectors are as follows.
-
Select all elements whose position is less than 2 in similar elements.
//[position()<2] -
Select all "span" elements with a position greater than 1 in similar elements.
//span[position()>1]
Examples of manual XPath value definition
Examples of manual XPath value definition for some source sites, as guided by the tools and methods discussed in this article, are as follows. Shared examples may differ due to structural changes that may occur over time on source sites. The same methods can be applied to other source sites with similar properties too.
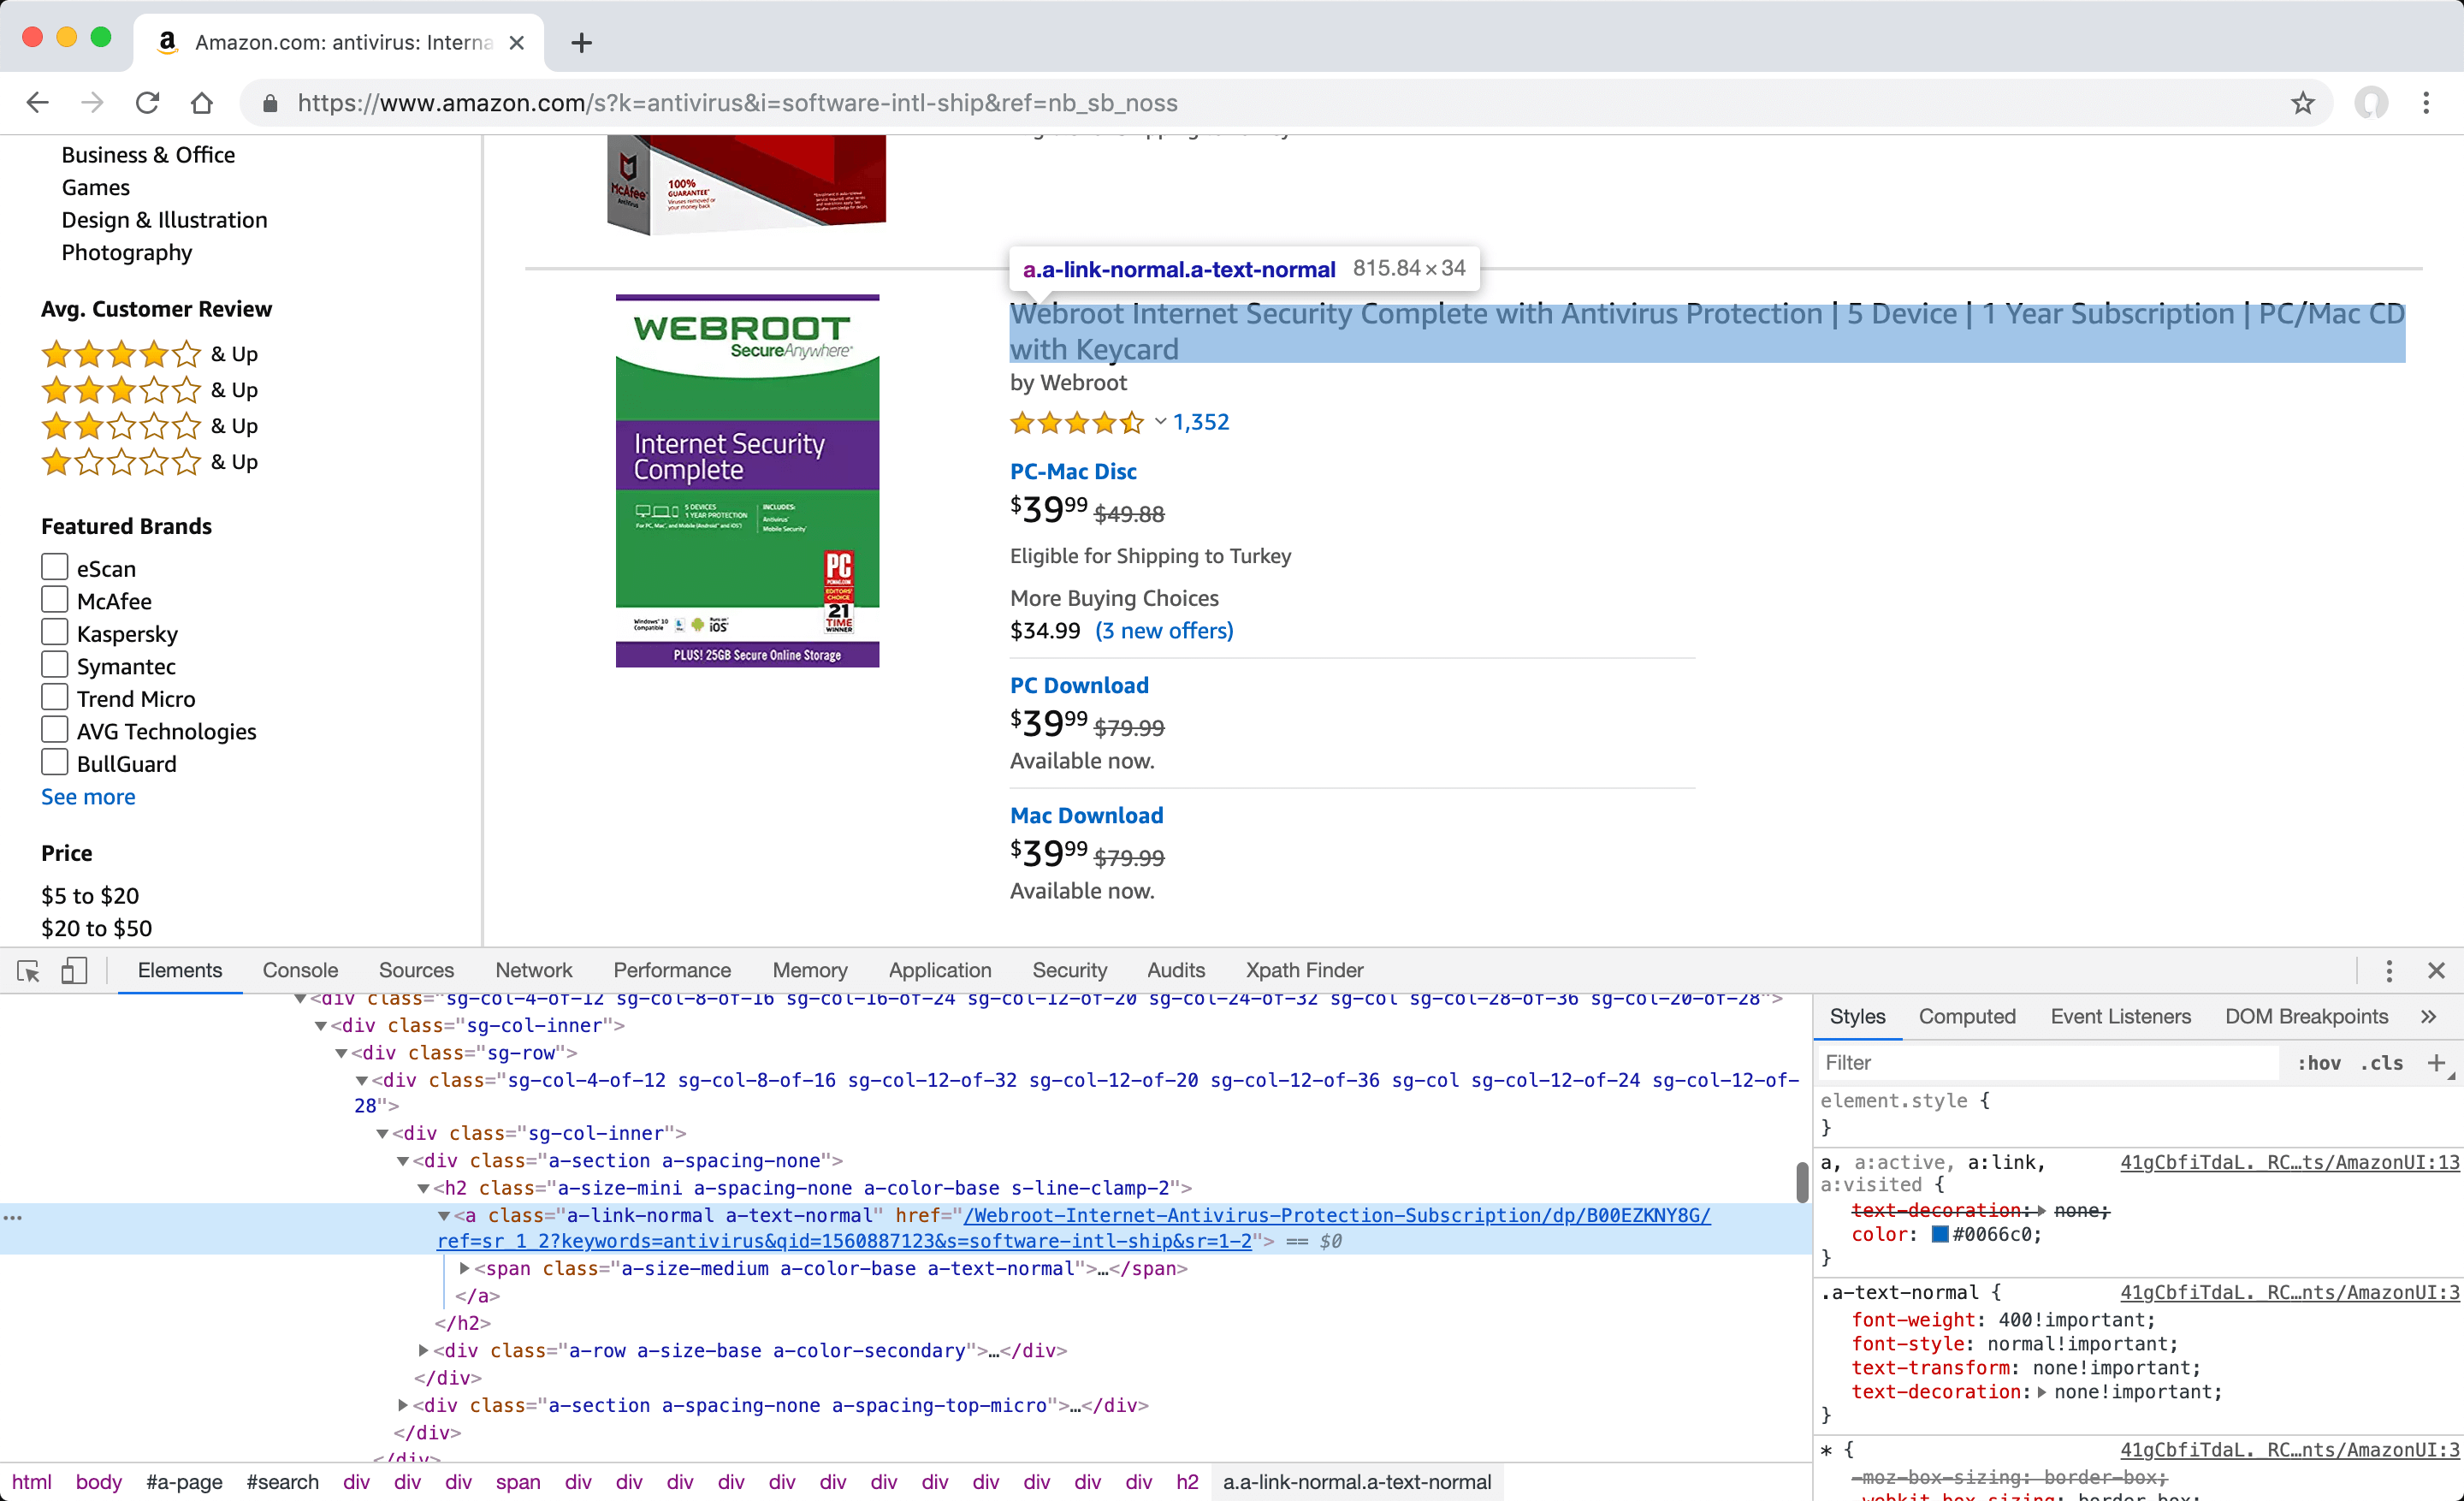
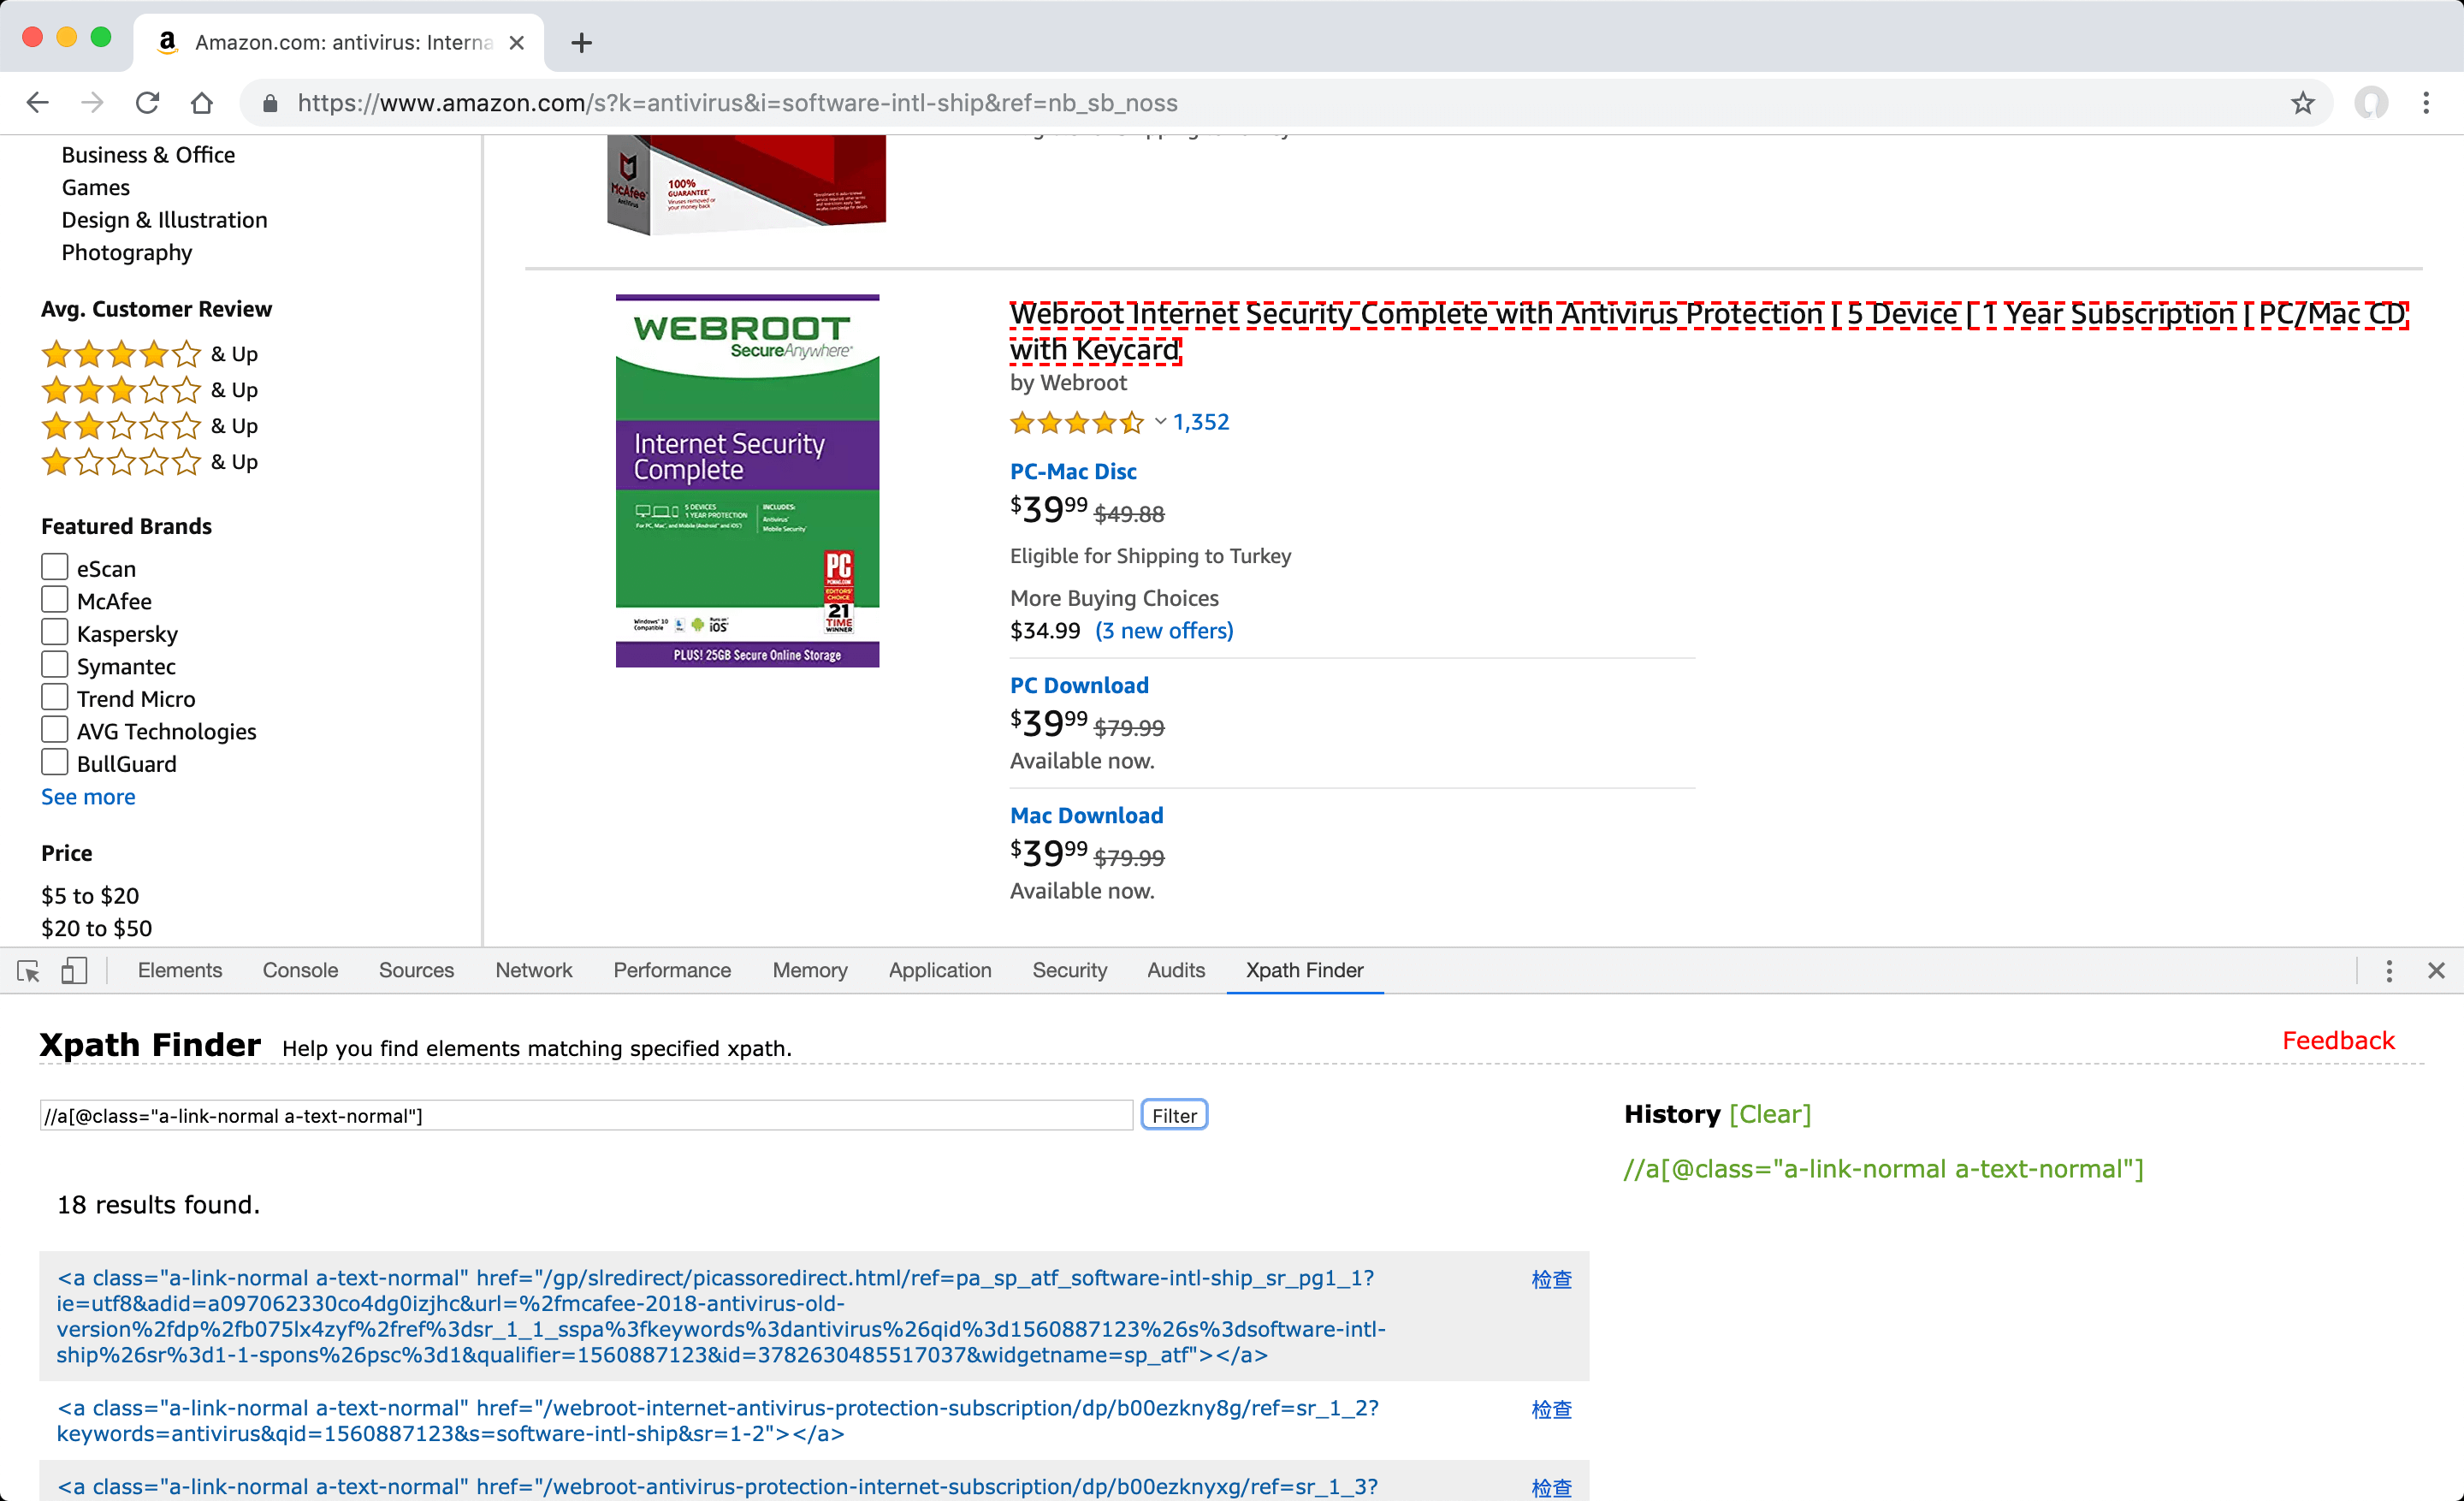
Defining manual "post item" value for Amazon
Post item; Since the XPath value of the first of the summary contents on the listing page on the source site, which redirects to the detail page when clicked, is the field to be defined, the steps you need to follow to find the value matching this definition are as follows. Make sure you also check "exact match" option after defining a manual XPath for post items.
- In Amazon, select the "Software" category and search for "Antivirus". You can then change the selected category and search word for this example to suit your needs later. Make a note of the web address in the browser for later use as the "Source URL".
- Disable JavaScript code and refresh the page by clicking the "Quick Javascript Switcher" button in the extensions section to simulate how the page is rendered without JavaScript at server-side using PHP.
-
In your browser, open the "Elements" tab under "Developer Tools" (F12) and identify the first anchor from the summary content that leads to the detail pages when clicked.

- Review whether the detected element has a descriptive property that can be selected with any selector to find the XPath value. For example, you can use the attribute selector and the value defined in the "class" attribute of this element.
-
Enter the attribute selector format XPath value of this element with the class attribute of //a[@class="a-link-normal a-text-normal"] format to the "XPath Finder" tab under "Developer Tools" (F12) in your browser and click "Filter" button, in order to check and see if it also finds the other elements of the same type to be followed.
- When the entered XPath value works as desired and finds the all correct elements, check that it also works for the next listing pages to make sure it fits your needs. If appropriate, you can define this value in the "Post item" field.
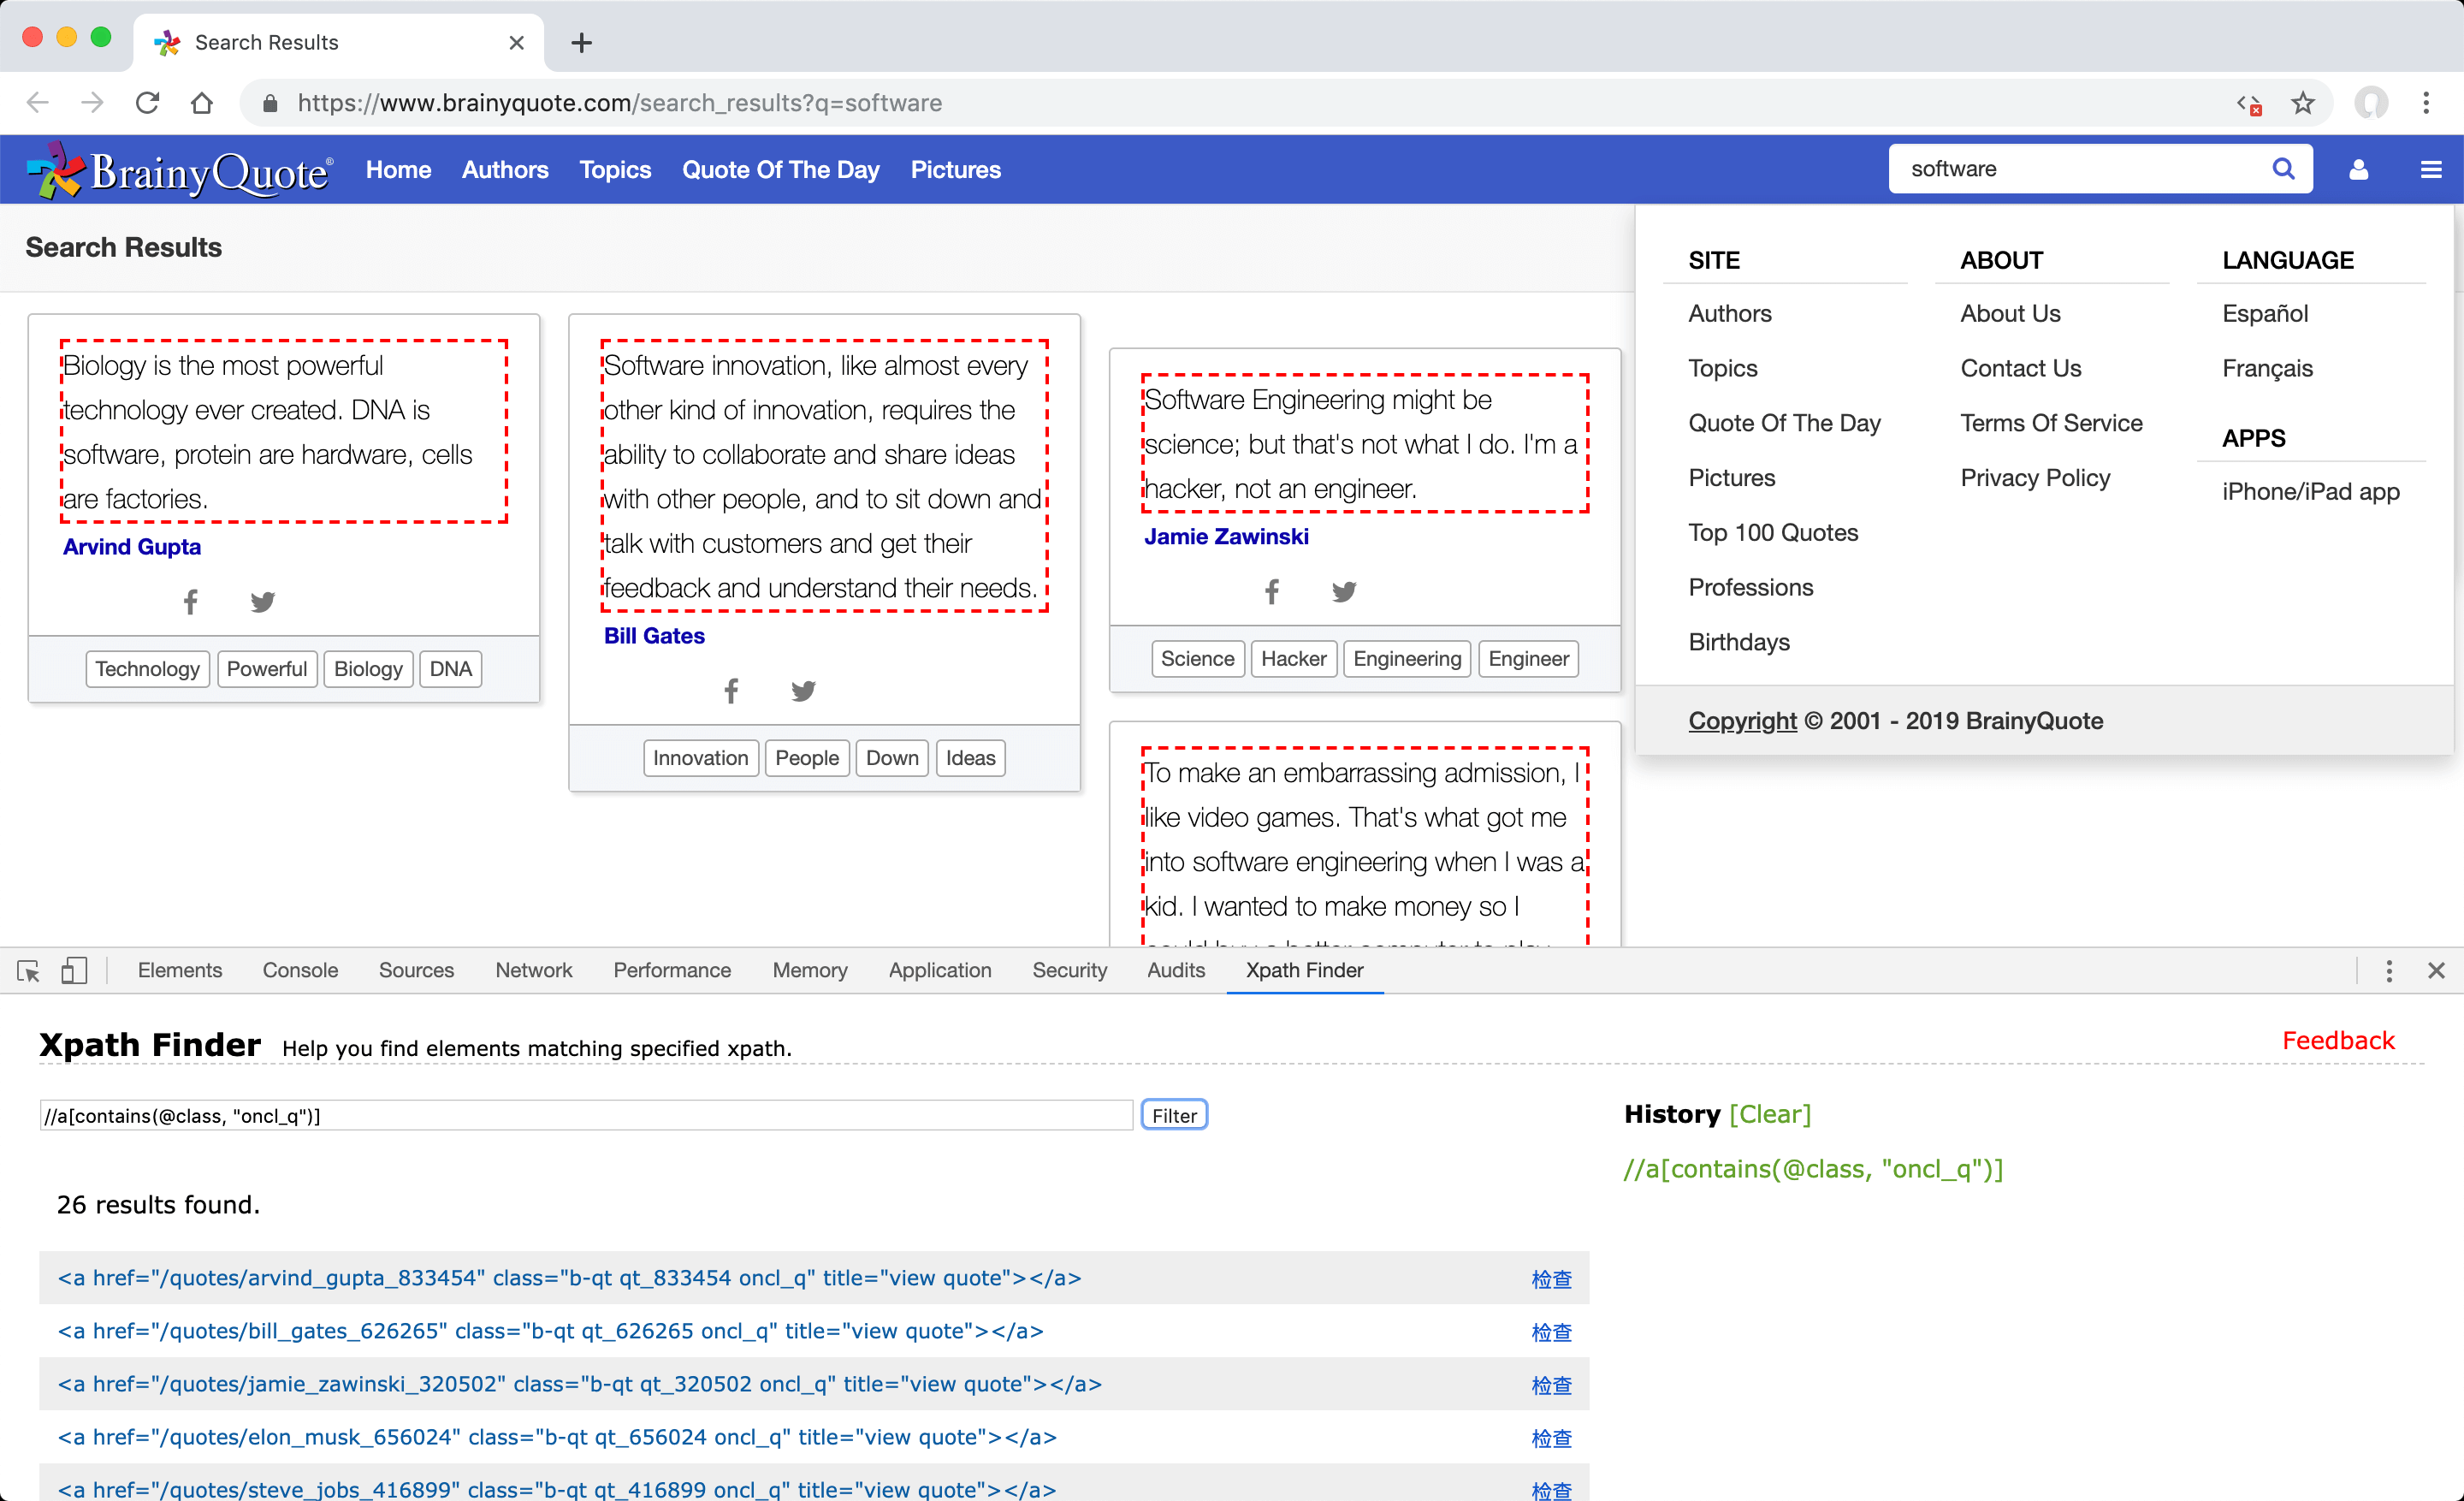
Defining manual "post item" value for Brainy Quote
Post item; Since the XPath value of the first of the summary contents on the listing page on the source site, which redirects to the detail page when clicked, is the field to be defined, the steps you need to follow to find the value matching this definition are as follows. Make sure you also check "exact match" option after defining a manual XPath for post items.
- In Brainy Quote, search for "Software" keyword. You can then change the selected search word for this example to suit your needs later. Make a note of the web address in the browser for later use as the "Source URL".
- Disable JavaScript code and refresh the page by clicking the "Quick Javascript Switcher" button in the extensions section to simulate how the page is rendered without JavaScript at server-side using PHP.
- In your browser, open the "Elements" tab under "Developer Tools" (F12) and examine the values of the "class" attributes of the links for the first three of the summary content that, when clicked, lead to detail pages.
-
Instead of selecting these elements directly according to the attribute value because they consist of multiple and variable values such as "b-qt qt_656024 oncl_q", "b-qt qt_833454 oncl_q", "b-qt qt_776018 oncl_q" enter //a[contains (@class, "oncl_q")] XPath value, which is the translation of their common "oncl_q" value into the containing attribute selector format, in the "XPath Finder" tab under "Developer Tools" (F12) in your browser and click the "Filter" button, in order to check and see if it also finds other elements of the same type to be followed.
- When the entered XPath value works as desired and finds the correct elements, check that it also works for the next listing pages to make sure it fits your needs. If appropriate, you can define this value in the "Post item" field.
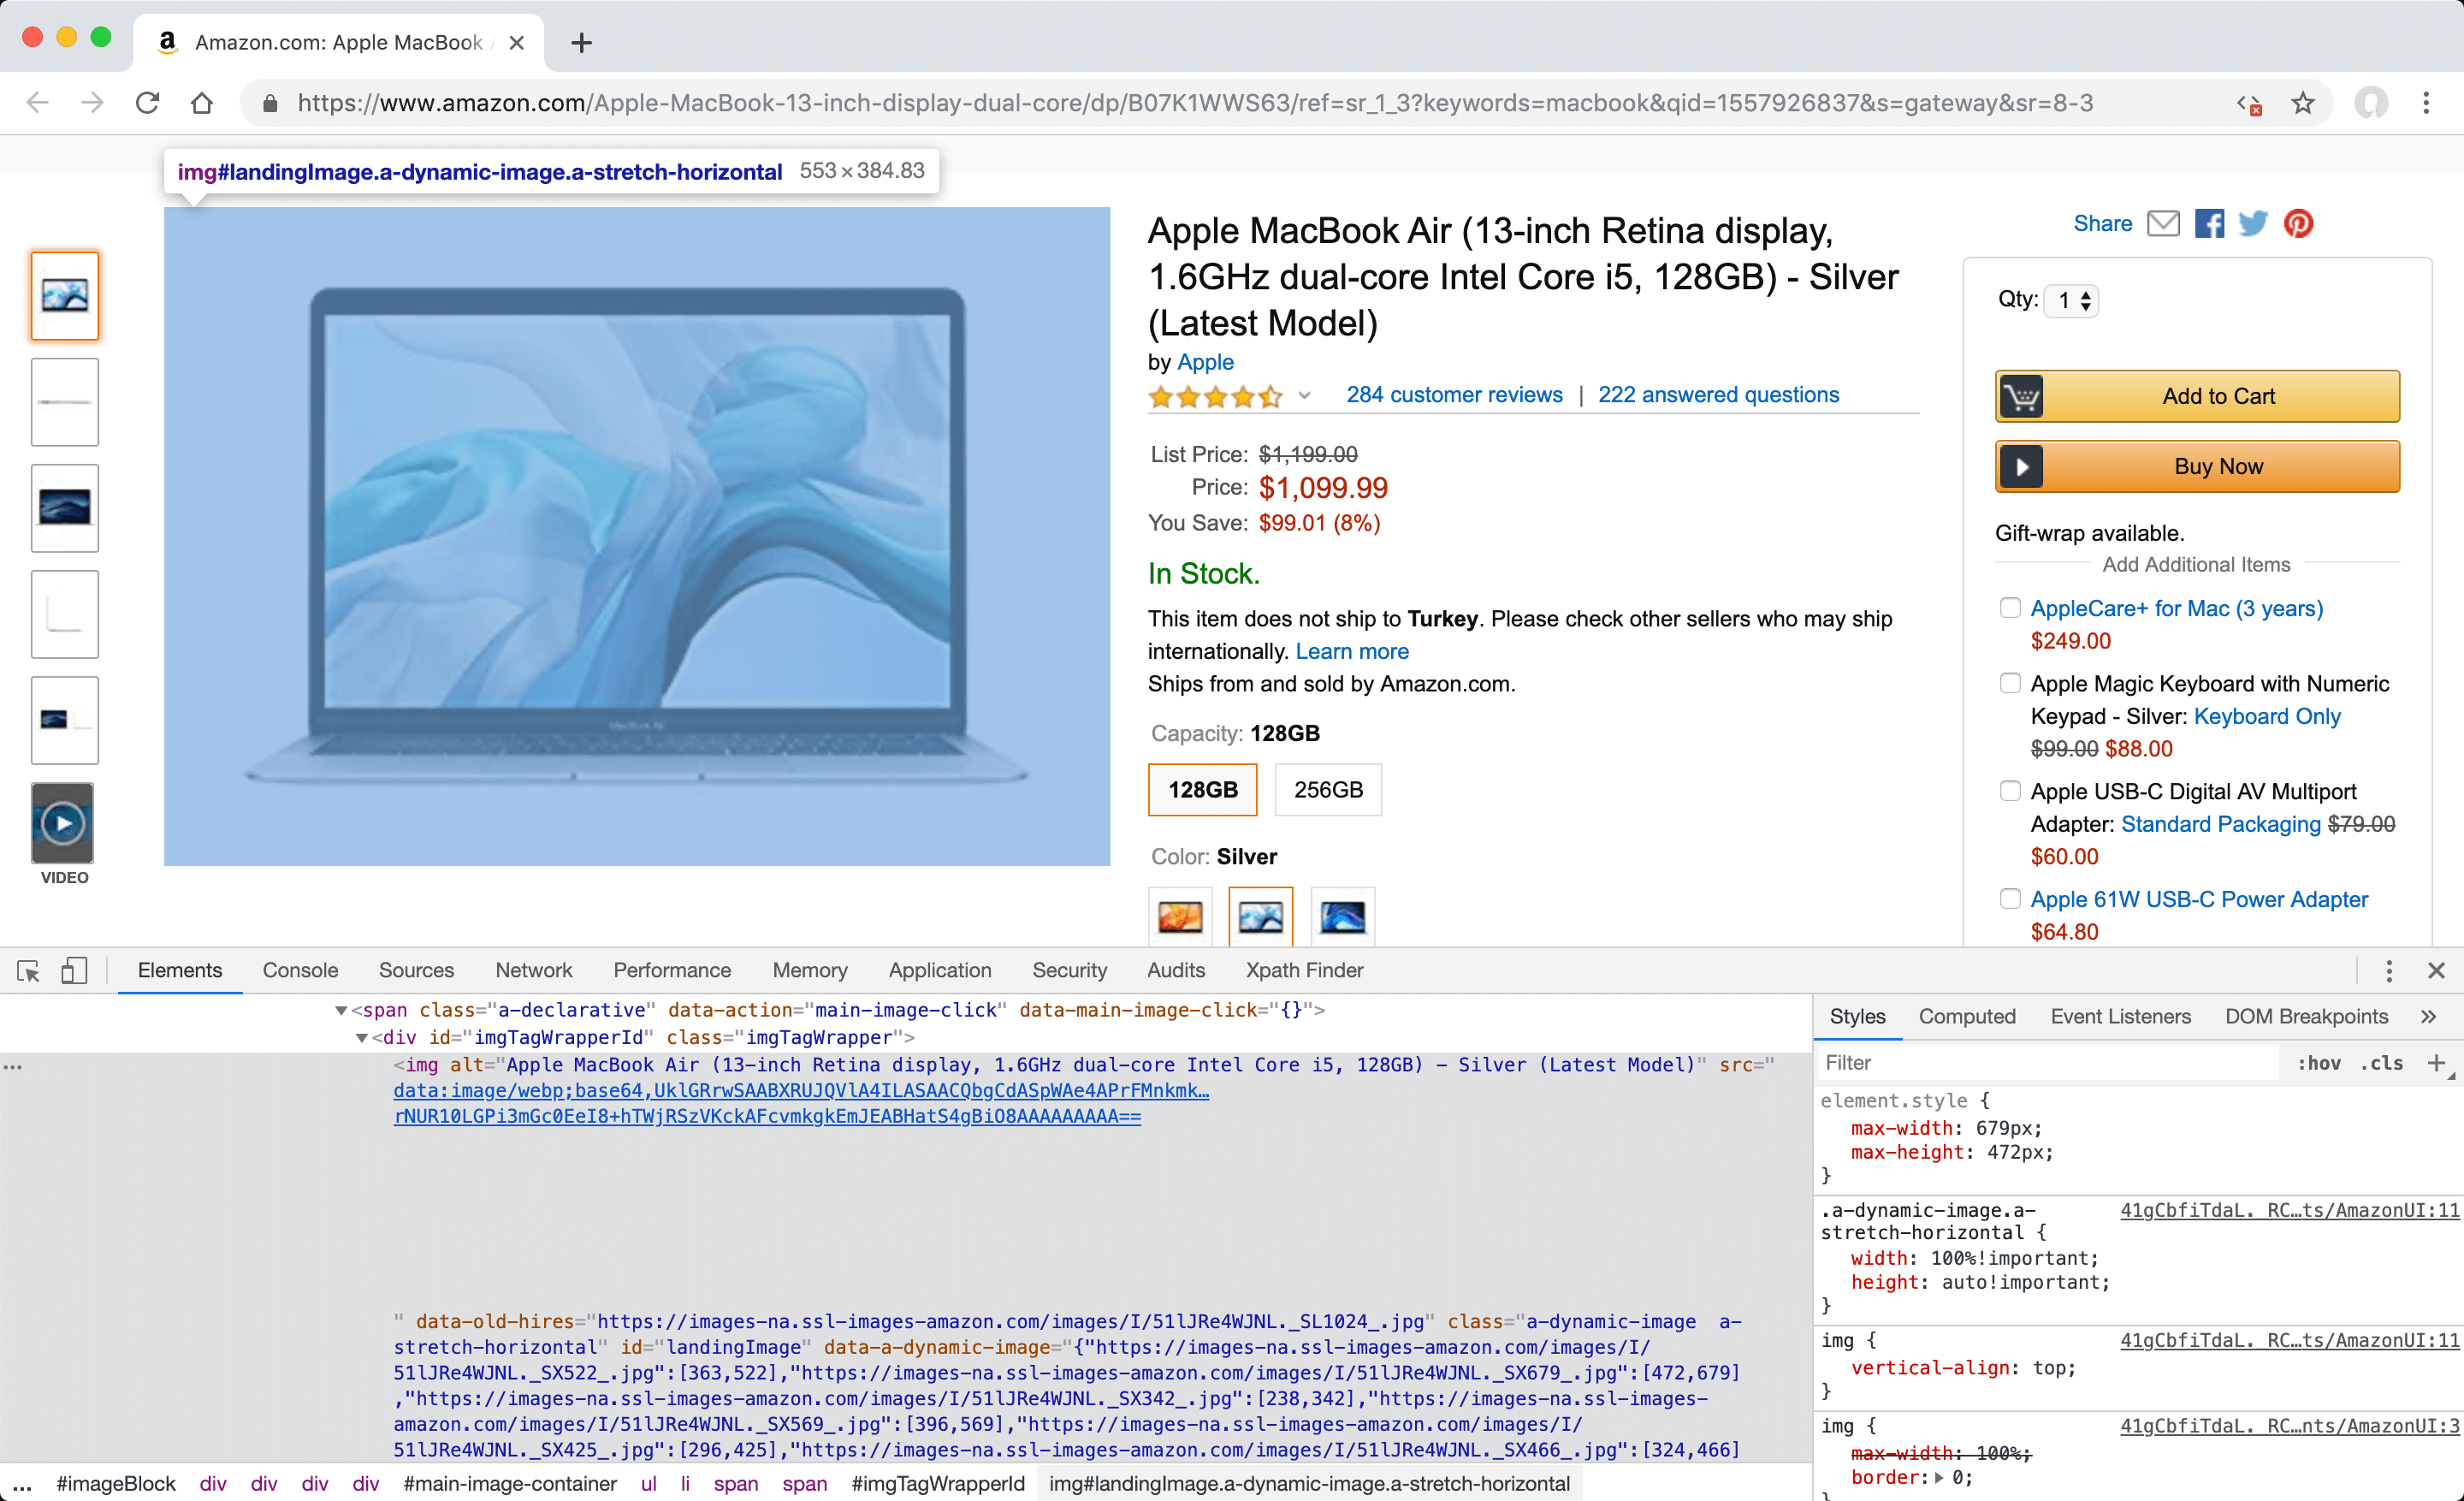
Defining manual "featured image" for Amazon
Amazon uses the JavaScript method called lazy load and define "data-old-hires" attribute to load images after the page is opened, instead of directly defining the addresses of the image to the "src" attributes of the "img" tags to increase the opening speed. The steps to find this value are as follows.
- In Amazon, open the detail page for the product named "Apple Macbook. You can change the selected product detail page for this example later to suit your needs.
-
Disable JavaScript code and refresh the page by clicking the "Quick Javascript Switcher" button in the extensions section to simulate how the page is rendered without JavaScript at server-side using PHP. Unlike normal images, only raw versions of these images with low resolution and unmodified tags by JavaScript will be displayed.
- In your browser, open the "Elements" tab under "Developer Tools" (F12) and identify the image element you want to select as the featured image. You can also do this by searching the address of the image file before disabling the JavaScript code in the page source code.
-
Since the address of the high-resolution version of the image file before disabling the JavaScript codes, is defined as 'data-old-hires' attribute of the 'img' element with value of the 'id' attribute is 'landingImage'; when converted to the attribute selector format //img[@id="landingImage"]/@data-old-hires, enter this XPath value in the" "XPath Finder tab under "Developer Tools" in your browser, and click "Filter" to check that it has found the visual element you want to select as the featured image.
- When the entered XPath value works as desired and finds the correct elements, check that it also works for the next listing pages to make sure it fits your needs. If appropriate, you can define this value in the "Featured image" field.

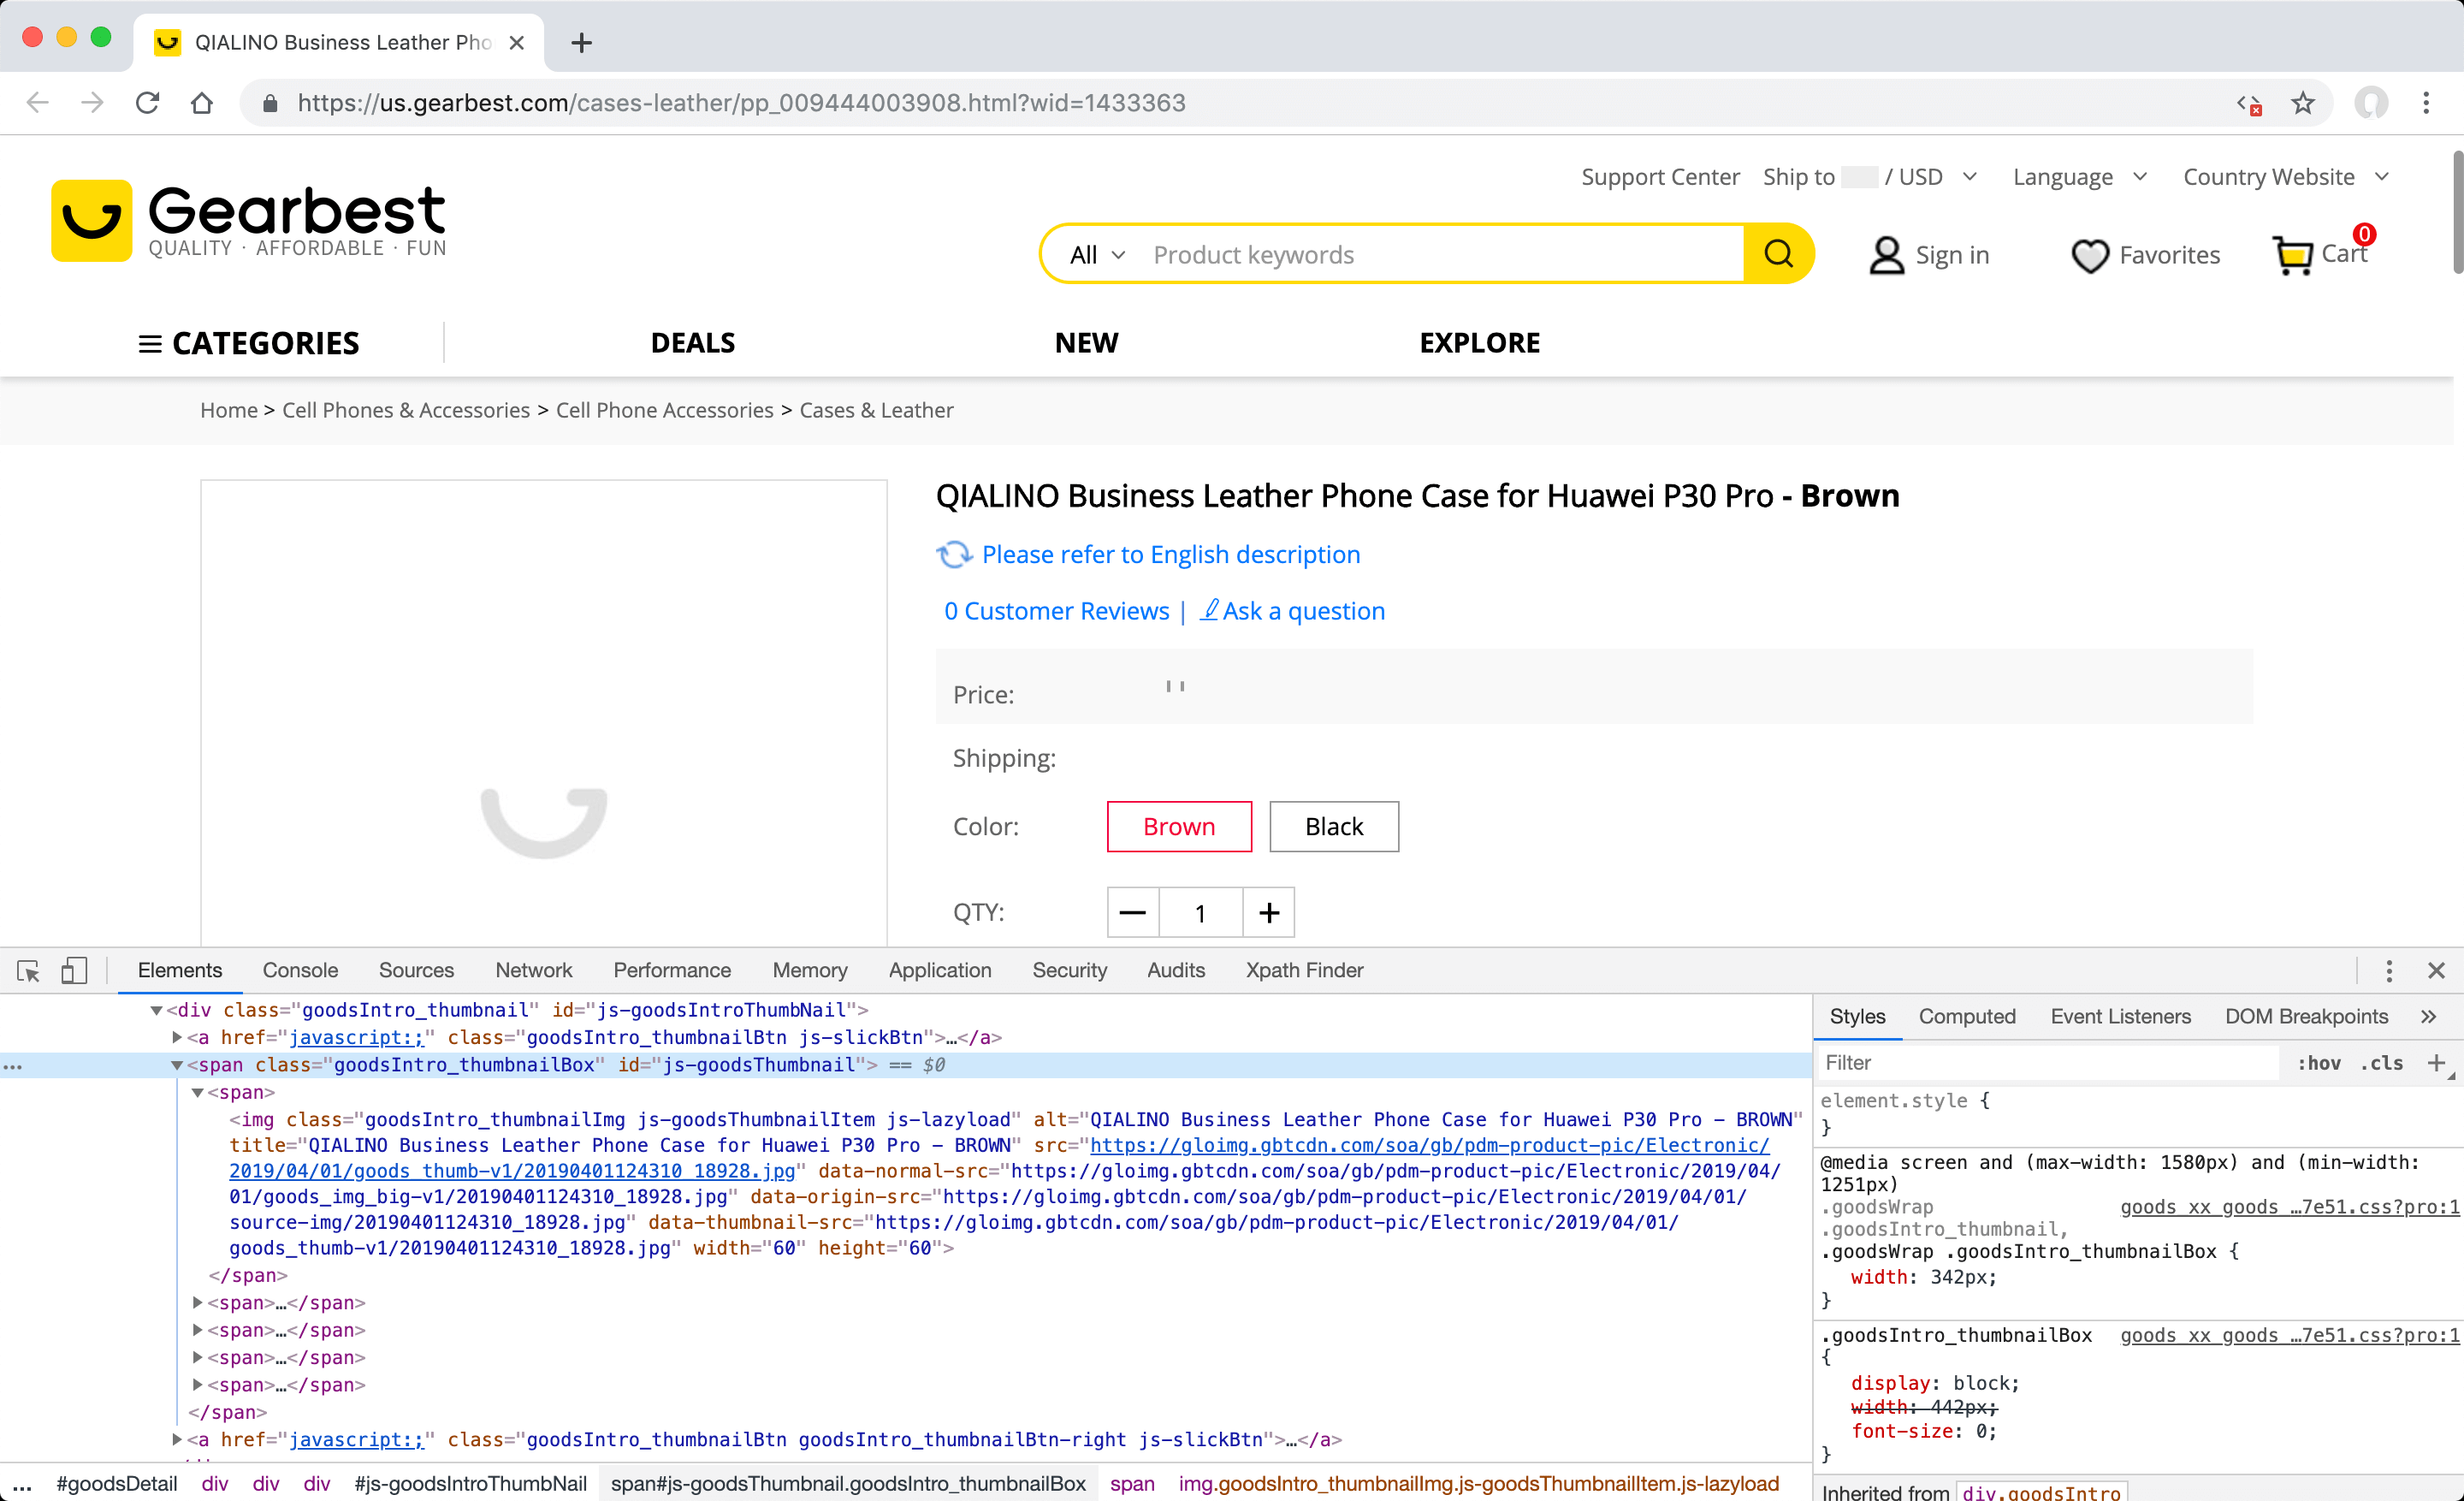
Defining manual WooCommerce gallery "custom field" value for Gearbest
You can save the images in Gearbest's product detail page as a WooCommerce gallery thanks to "custom field" support, but the first image is used as the featured image on the source site, causing you to save the same image twice in your own WooCommerce gallery one for featured image, and the other for first image gallery. To prevent this situation, the steps you need to take to find the XPath value without taking the first image in the gallery are as follows.
- Open the product page "QIALINO Business Leather Phone Case for Huawei P30 Pro" on Gearbest. You can change the selected product detail page for this example later to suit your needs.
-
Disable JavaScript code and refresh the page by clicking the "Quick Javascript Switcher" button in the extensions section to simulate how the page is rendered without JavaScript at server-side using PHP. Since the images are loaded after opening the page using the JavaScript method called lazy load, after this process images will become invisible.
-
In your browser, open the "Elements" tab under "Developer Tools" (F12) and identify the gallery container element. You can also do this by searching the address of the any related image file before disabling the JavaScript code in the page source code.
-
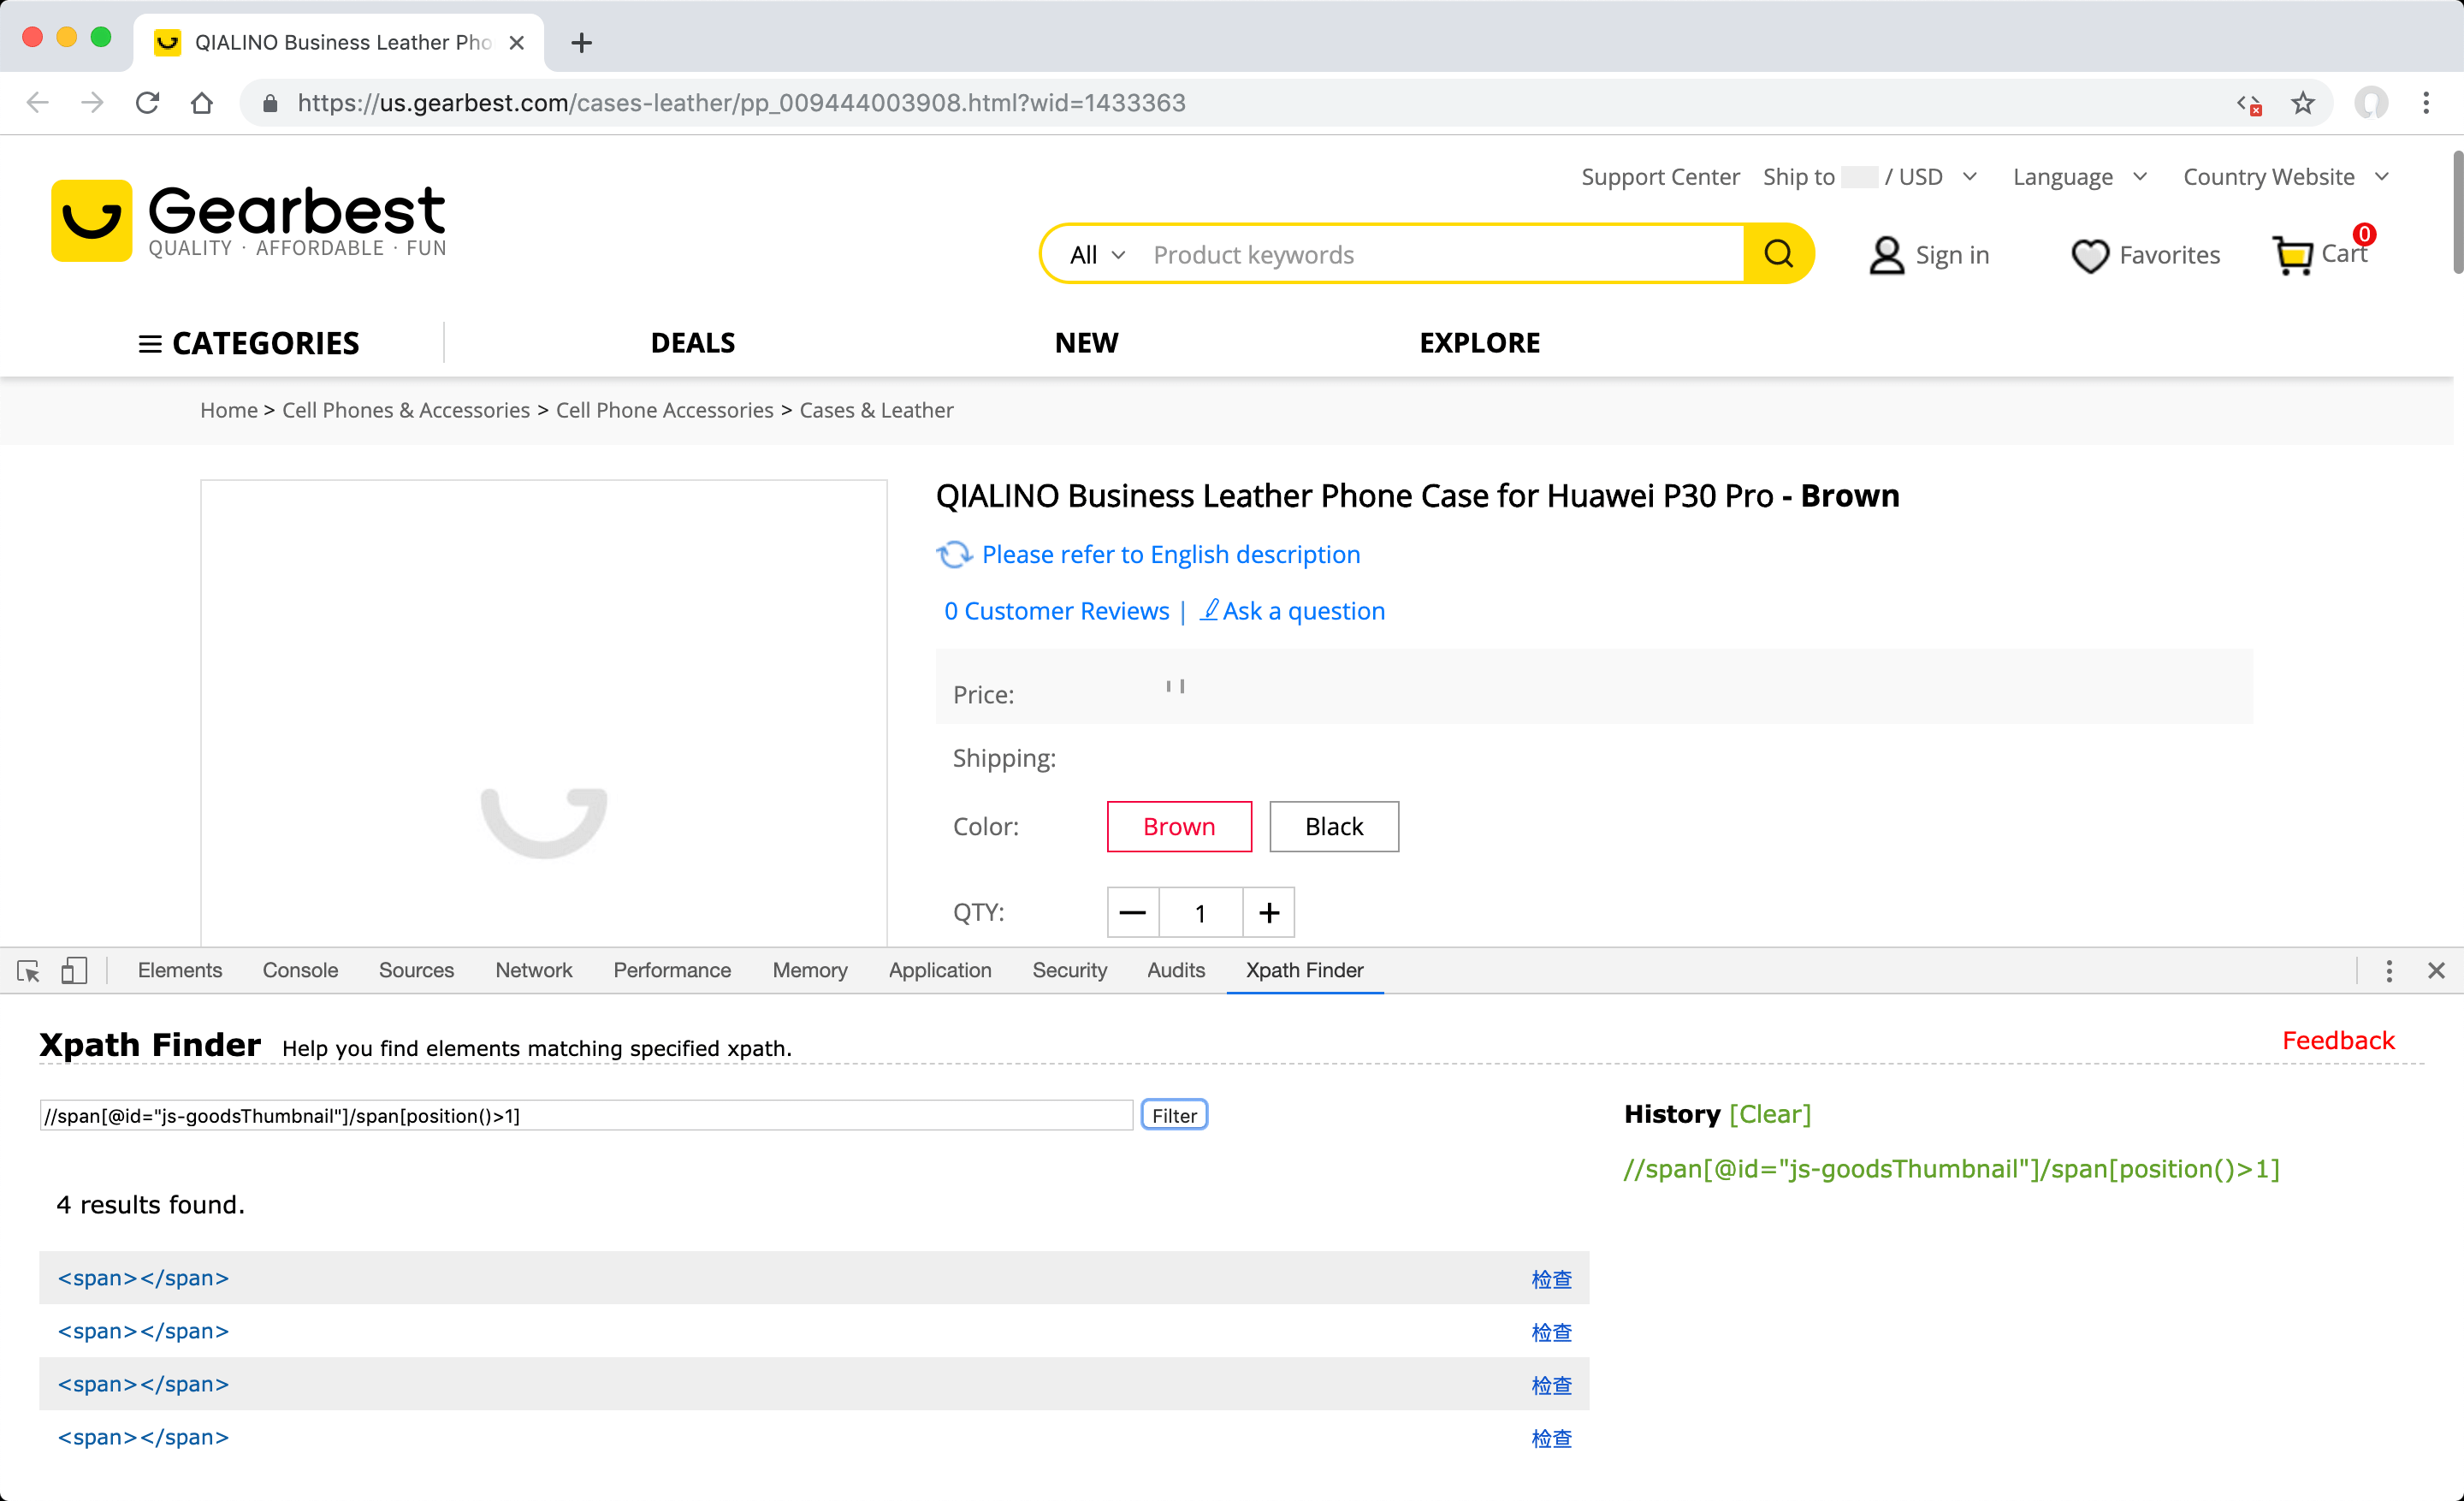
The desired visual file is contained within the sequential "span" elements contained by the "span" element, which has the value of" id "attribute "js-goodsThumbnail". To prevent saving 2 times, it is necessary to select the element that contains the image without adding "/img" at the end by using position selector format enter //span[@id="js-goodsThumbnail"]/span[position()>1] XPath value to "XPath Finder" tab under the "Developer Tools (F12)" and click the "Filter" button to see if you can find the span elements that contain the visual elements you want to include in the gallery.
-
The entered XPath value will work as desired and find the correct elements. However, the address of the "src" attributes have low resolution version of image files defined in the "span" elements found. Since the address of high-resolution versions is defined as "data-origin-src"; the attribute of the custom field that you need to create are as follows.
Name:
_product_image_gallery
Value://span[@id="js-goodsThumbnail"]/span[position()>1]
Attribute:data-origin-src

Defining manual "tags" value for Medium
When selecting tags, categories or other post type taxonomies with separators, simply select the smallest area covering these elements with the visual selector and define the separator between them. However, on some sites such as Medium, in case there is no separator between these elements, the steps you need to follow to manually define XPath are as follows.
- Open the article detail page "What Is Artificial Intelligence (AI)?" In Medium. You can later change the article detail page selected for this example to suit your needs.
-
Open the "Elements" tab under "Developer Tools" (F12) in your browser and identify one of the" a "elements of the tags located at the bottom of the article.
- Check whether the detected element has a descriptive property that can be selected with any selector to find the XPath value. For example, you can use the common value defined in the attribute selector and the "class" attribute of these elements.
-
Enter //a[@class="link u-baseColor--link"] XPath value, which is the translation of the value of the "class" attribute of this element into the attribute selector format, in the "XPath Finder" tab under "Developer Tools" (F12) in your browser and click the "Filter" button to see if it finds other elements of the same type.
- When the entered XPath value works as desired and finds the correct elements, you can define it in the "Value" field.


Defining manual "tags" value for TechCrunch
Although TechCrunch has tags with separators between them, these tags were developed to display on the interface only after the page was opened using the JavaScript method called ajax; they cannot be detected on the server side with PHP and cannot be selected with the visual selector. In this case, the steps you need to follow to manually define XPath are as follows.
- Open the article detail page "Quadric.io raises $15M to build a plug-and-play supercomputer for autonomous systems"In TechCrunch. You can later change the article detail page selected for this example to suit your needs.
- Disable JavaScript code and refresh the page by clicking the "Quick Javascript Switcher" button in the extensions section to simulate how the page is rendered without JavaScript at server-side using PHP. The tags are loaded after opening the page using the JavaScript method called ajax, which makes them invisible.
-
In your browser, open the "Elements" tab under "Developer Tools" (F12) and identify the element that contains the tags. You can do this by searching for words like "tag" in the page source code.
-
The searched tags are in "content" attribute of "meta" element with the separator "," and name attribute value is "sailthru.tags"; so you can define //meta[@name="sailthru.tags"]/@ content, which is translated to the attribute selector format, XPath value in the "Value" field as follows.
Value:
//meta[@name="sailthru.tags"]/@content
Separator:,

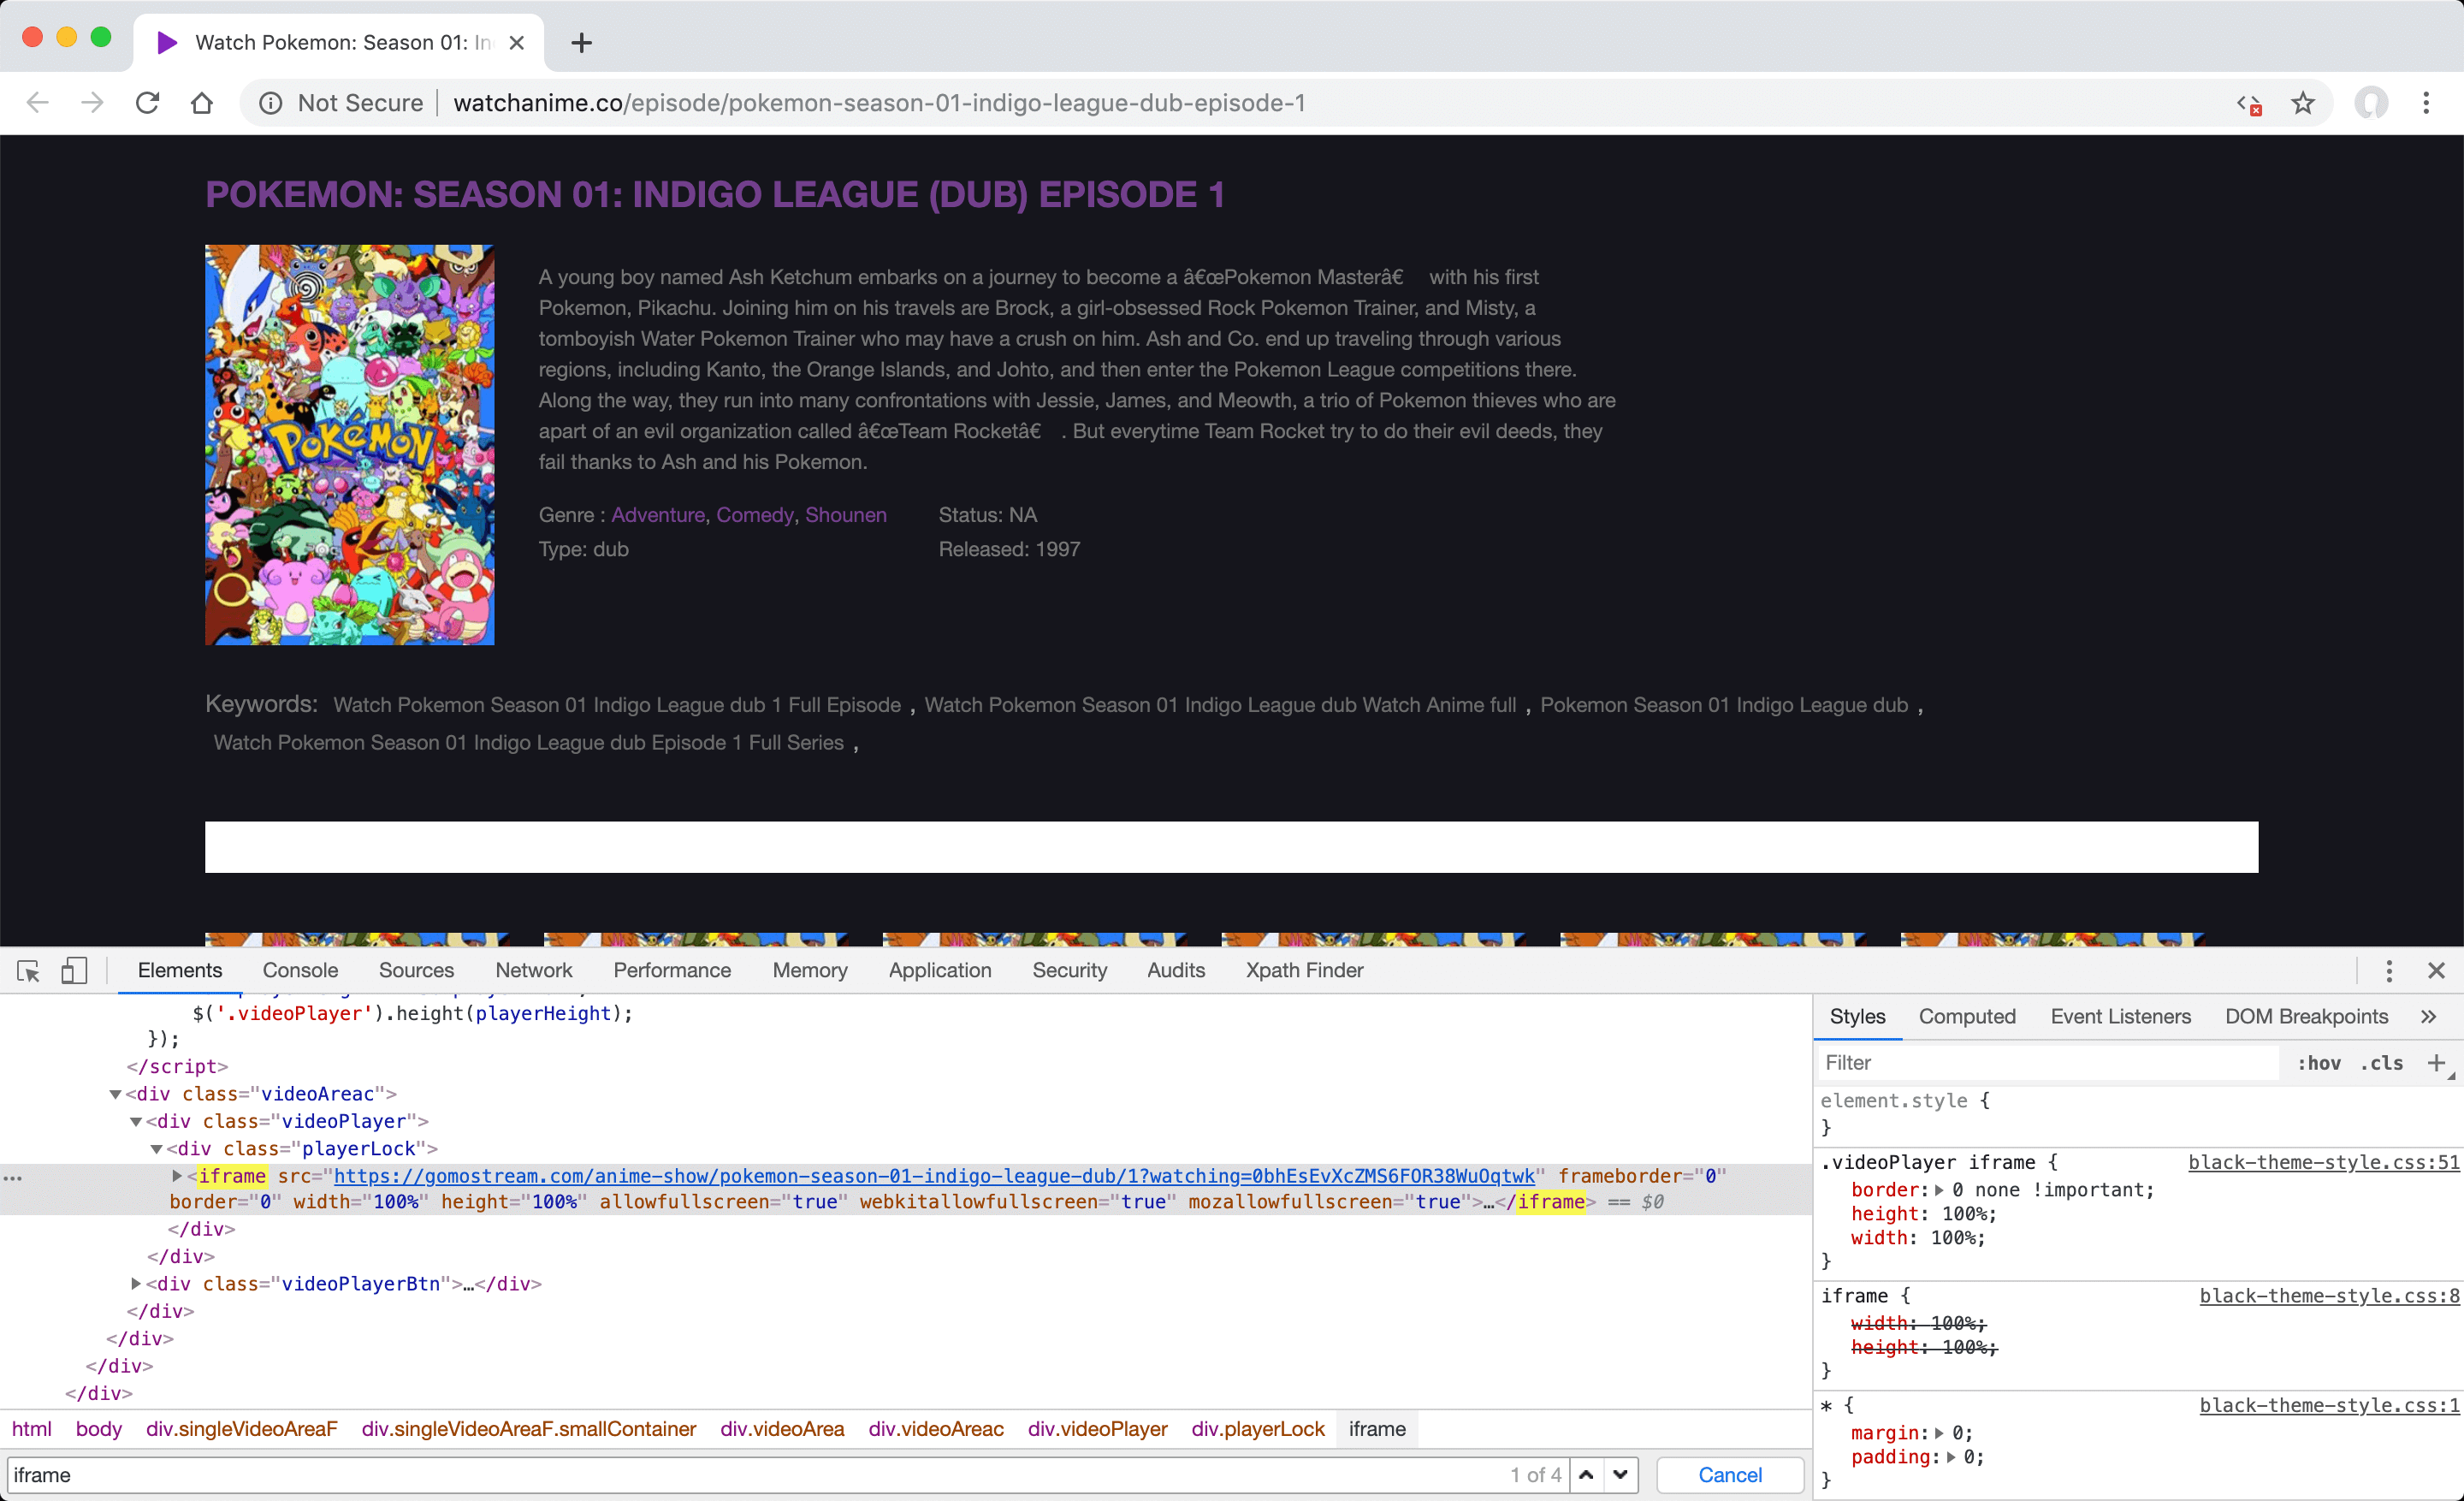
Defining manual iframe "custom field" for Watch Anime
Instead of retrieving the full post content of source sites that provide iframe or video embed code, such as Watch Anime, you may want to use the address of the corresponding video player and define it into a custom field. In this case, the steps you need to follow to manually define XPath are as follows.
- Open video detail page "Pokemon: Season 01 - Indigo League Episode 1" in Watch Anime. You can later change the article detail page selected for this example to suit your needs.
- Disable JavaScript code and refresh the page by clicking the "Quick Javascript Switcher" button in the extensions section to simulate how the page is rendered without JavaScript at server-side using PHP. If the iframe element is still visible after this operation, it means it is appropriate for the operation, otherwise it may not be suitable for the scraping operation.
-
In your browser, open the "Elements" tab under "Developer Tools" (F12) and identify the element that contains the video player address. You can do this by searching for words like "iframe" in the page source code.
-
Since the address of the desired video player is defined in the "src" attribute of the "iframe" element under the "div" element, which "class" attribute value is "playerLock", so the properties of the custom field you need to create to get this value are as follows. You can define any other name in the "Name" field too.
Name:
videoURL
Value://div[@class="playerLock"]/iframe
Attribute:src -
To assign the address of the video player to an iframe of the desired size in the content field assigned to the created custom field, activate the "Enable template" feature of the "Content" field and enter the value below.
<iframe src="[scrape_meta name="videoURL"]" width="320" height="280"></iframe>