

Octolooks
The steps you should take to start using Octolooks Scrapes immediately after your purchase are pretty straightforward. Let us examine all the details of this process together.
Octolooks Account
To view the details of your current orders, complete your pending orders or access the required installation files and your purchase codes later, you need an Octolooks account that you can sign in when you need.
Your account; is automatically created when you complete the “Billing details” form on the payment page and proceed to the payment step, and your login information will be forwarded to your email address with the title of “Your Octolooks account has been created!”, so you don’t need to create an account manually. You can edit this information later on your account details page as you wish.
Since the login information of your account is automatically sent to the email address you specified, it is recommended that you check your information and verify its accuracy. Even you are sure about your information, but the email does not reach your inbox, please check your spam / junk folder or contact us.
Setup file and purchase code
In order to install and validate Scrapes on your website, you need the WordPress plugin file and the purchase code (license key). Although your account is set up when you have completed billing details form and move to the payment step, your access to the installation file and purchase code is only provided when you successfully complete the payment process.
Immediately after the successful payment, you will be directed to an information page with order details. You can download the installation file “Scrapes.zip” from the section named “Downloads” on this page and access your purchase codes from the section named “License Keys”.
You can access this information later by clicking the “View” button from the orders page on your account or by viewing the email titled “Your Octolooks order is now complete” sent to your email address. Once you have received your installation file and purchase code, you can proceed to the installation step.
Installation
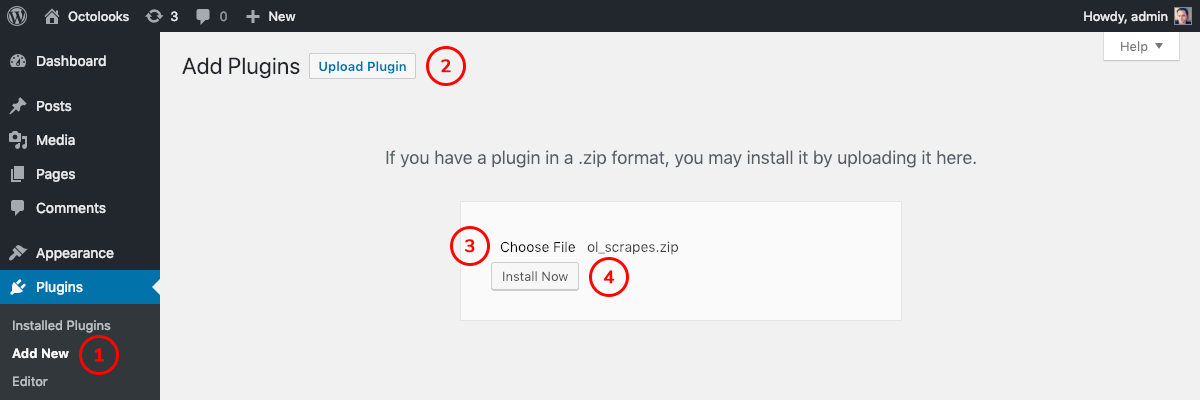
The first step to start the installation is to upload the required installation file to your website. The installation file is named “ol_scrapes.zip” under “Plugin” folder located in the “Scrapes.zip” file that you downloaded, so be sure to not upload the downloaded file directly without extracting instead of the installation zip file only. The instructions you should follow are no different from those of other WordPress plugins, as described below.
- Sign in to the WordPress administration (wp-admin) panel.
- Click the “Plugins » Add New” link from the left navigation.
- Click the “Upload Plugin” button at the top left of the screen
- Click the “Choose File” button and select “ol_scrapes.zip” file.
- Click the “Install Now” button to start the upload process.
- Click the “Activate Plugin” button after upload process is completed.
Immediately after the installation, the Scrapes menu is added to the left navigation in your WordPress administration panel. This means that you have successfully completed the setup process.
Purchase code validation
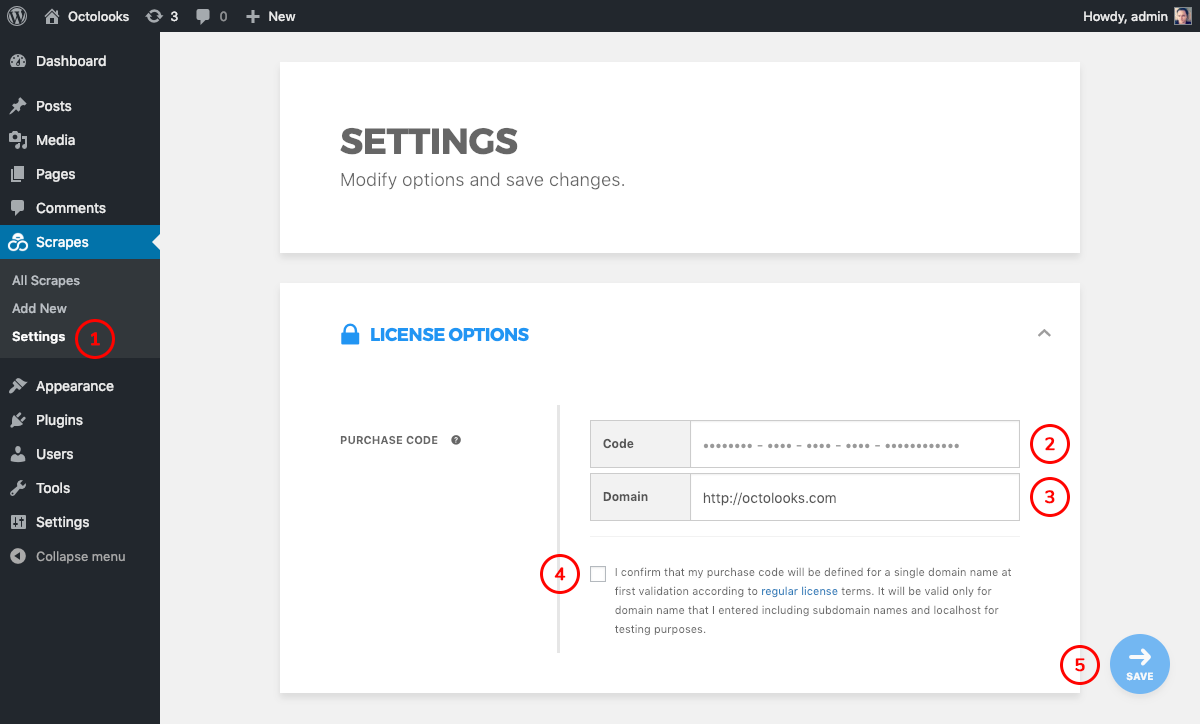
The final step is the purchase code (license key) validation to start using Scrapes. The steps you should take to do this are as follows.
- Sign in to the WordPress administration (wp-admin) panel.
- Click the “Scrapes » Settings” link from the left navigation.
- Enter the purchase code and domain field values completely and accurately.
- Check the terms of use conditions beginning with “I confirm”.
- Click the “Save” button which turns active state.
“Purchase code is validated” message is displayed immediately after the validation process. This means that you have successfully completed the validation process. Other details you need to pay attention to when performing the validation process are as follows.
- The address of the website you are installing and the address entered in the domain field must be the same.
- Your purchase code is defined to the first validated domain, and only works for this domain including its sub domains of this domain and localhost.
- In order to run on SSL certified domains, you must type your domain name in “http” instead of “http(s)”. So it works smoothly in both cases.
- If you didn’t decide your domain name yet, you can register it with “http://localhost” domain name to run the plugin on localhost for testing purposes and contact us for change after you decide your domain name.
Deactivation and deletion
In order to deactivate the plugin log in to your WordPress administration panel and click “Plugins » Installed Plugins” link from left navigation. Afterwards click “Deactivate” link under Octolooks Scrapes plugin. You will see Scrapes tab with Octolooks logo is disappeared when the deactivation process completed. You can also click “Delete” link and completely remove the plugin from your server.
Update
If you don’t have any currently running Scrapes tasks, deleting the old version and installing the newer version of the plugin is enough to update. But if you already have Scrapes tasks and want to preserve them, you should follow these steps below for a smooth update process.
- Backup your existing tasks from “Tools » Export” menu, select “Scrapes” option and click “Download Export File” button.
- Deactivate “Octolooks Scrapes” from “Plugins” menu, and then delete.
- From “Plugins » Add New” menu, click “Upload Plugin” button and upload the new zip file. Then complete the installation by clicking “Install Now” button.
- From “Tools » Import” menu, click “WordPress » Run Importer” link. If you don’t have WordPress importer tool, you can install it from the same menu by clicking “Install Now” link.
- Click “Choose File” button and select your backup xml file, then complete the process by clicking “Upload file” and import button.
- Your old tasks will be on “Scrapes » All Scrapes” menu with the status “Waiting”. In order to run them click “Edit” button, check for the new fields that may appear for newer version and choose your options then finally click the “Save” button to save changes you made.